Difference between revisions of "50V example build"
(Format images, change some sentences, etc. Changed content until `External control`) |
|||
| Line 1: | Line 1: | ||
| + | This is a first system that a survival mode player will make. | ||
| + | |||
| + | It's required for obtaining advanced elements which are needed for 200V+ systems. | ||
| + | |||
== Setup== | == Setup== | ||
| − | A [[50V Heat Turbine]] generates power by exploiting the temperature difference between a hot | + | A [[50V Heat Turbine]] generates power by exploiting the temperature difference between a hot side and a cold side. |
| − | + | Hot side is marked with a red square, cold with a blue one. | |
| − | [[ | + | We can use a [[Stone Heat Furnace]] to provide the heat to the hot side, and couple [[Small Thermal Dissipater]]s for the cold side. |
| − | + | [[File:Example_50V_1.png|600px]] | |
| − | |||
| − | [[File:Example_50V_2.png| | + | [[File:Example_50V_2.png|thumb|An example of [[Stone Heat Furnace]] ready to heat up turbines!]] |
| + | A furnace can take up to 2 [[Combustion Chamber]]s to improve efficiency. Valid fuels for the furnace are: | ||
| + | * Coal | ||
| + | * Charcoal | ||
| + | * Coal Block | ||
| + | * Bucket with lava (?) | ||
| + | * ... todo: check all other fuels and add them here | ||
| − | + | In our example, we will use Charcoal, since it's a very common solid fuel. | |
| − | [[ | + | After setting up furnace, we'll hook up a [[50V Macerator]] using [[Low Voltage Cable]]. |
| − | + | [[File:Example_50V_3.png|600px]] | |
| − | |||
| − | |||
| − | If you do this by hand, that can take quite some work! | + | == Using machines == |
| + | [[File:Example_50V_5.png|thumb|[[50V Macerator]] settings|right]] | ||
| + | For the optimal performance, keep the voltage supply bar in the green area, by using the Control Gauge in the heat furnace.<br /> | ||
| + | If you do this by hand, that can take quite some work! Move to the next section for the automatic way. | ||
| − | + | For this example, we will use a [[50V Macerator]], but the process is the same for all other machines. | |
| − | |||
| − | |||
| − | + | If you add some load to the macerator (for example, sand), you'll need to increase heat produced by furnace.<br /> | |
| − | + | After you remove the load, furnace will make too much heat and something will explode.<br /> | |
| + | So, you will need to decrease the heat. | ||
| − | + | You can also know if macerator is in the optimal voltage by listening to the sound it makes.<br /> | |
| − | + | The volume and pitch can tell you if the macerator is running at the optimal rate. | |
== Analogic control == | == Analogic control == | ||
| Line 34: | Line 43: | ||
Instead of controlling the temperature by hand, you can use an [[Analogic Regulator]] to keep it steady. | Instead of controlling the temperature by hand, you can use an [[Analogic Regulator]] to keep it steady. | ||
| − | [[File:Example_50V_6.png| | + | [[File:Example_50V_6.png|349px]] |
Use the Temperature gauge to set what temperature you want. 250-300 degrees corresponds to roughly | Use the Temperature gauge to set what temperature you want. 250-300 degrees corresponds to roughly | ||
| Line 42: | Line 51: | ||
== External control == | == External control == | ||
| − | Alternately, we can control the | + | Alternately, we can control the furnace by directly measuring the voltage on the line, and adjusting accordingly. |
* Set an [[Electrical Probe]] to 100% output at 50V, and 0% output at 55V. | * Set an [[Electrical Probe]] to 100% output at 50V, and 0% output at 55V. | ||
| Line 48: | Line 57: | ||
* Connect the probe to our furnace using a signal cable | * Connect the probe to our furnace using a signal cable | ||
* Set the Heat furnace to accept External Control (click once on the button labeled Internal Control) | * Set the Heat furnace to accept External Control (click once on the button labeled Internal Control) | ||
| − | |||
[[File:Example_50V_7.png|800px]] | [[File:Example_50V_7.png|800px]] | ||
Revision as of 14:46, 28 December 2016
This is a first system that a survival mode player will make.
It's required for obtaining advanced elements which are needed for 200V+ systems.
Setup
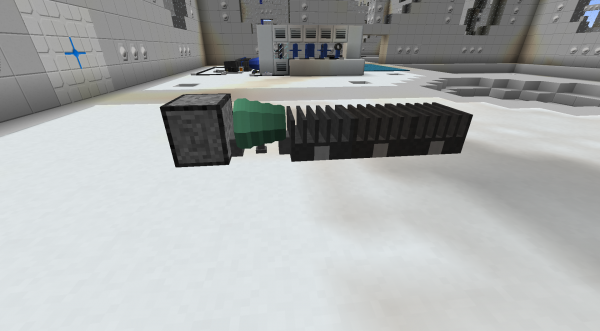
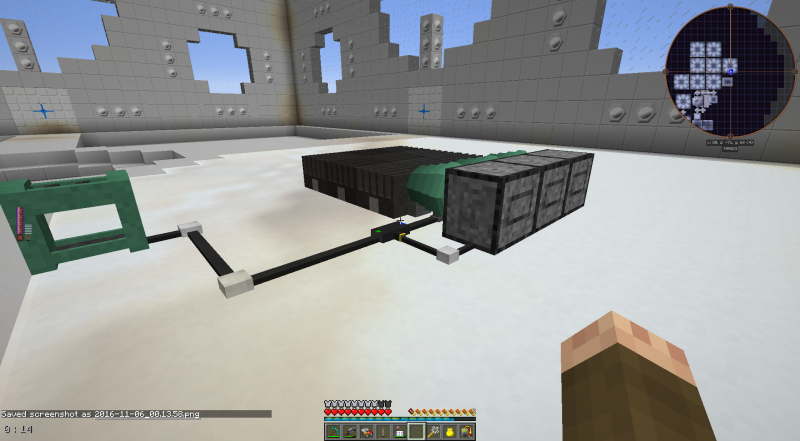
A 50V Heat Turbine generates power by exploiting the temperature difference between a hot side and a cold side. Hot side is marked with a red square, cold with a blue one.
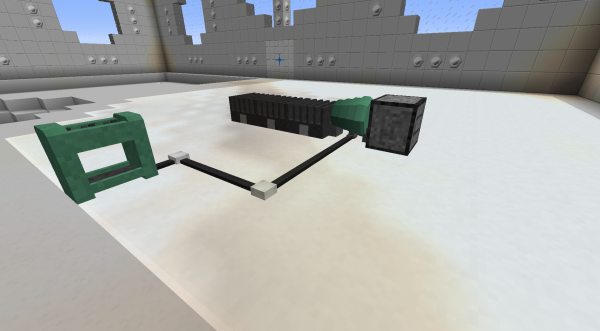
We can use a Stone Heat Furnace to provide the heat to the hot side, and couple Small Thermal Dissipaters for the cold side.

A furnace can take up to 2 Combustion Chambers to improve efficiency. Valid fuels for the furnace are:
- Coal
- Charcoal
- Coal Block
- Bucket with lava (?)
- ... todo: check all other fuels and add them here
In our example, we will use Charcoal, since it's a very common solid fuel.
After setting up furnace, we'll hook up a 50V Macerator using Low Voltage Cable.
Using machines

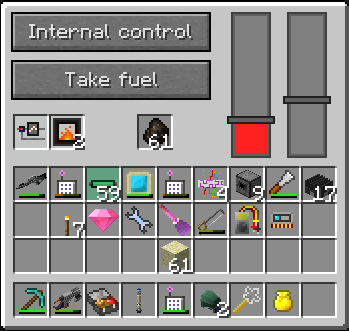
For the optimal performance, keep the voltage supply bar in the green area, by using the Control Gauge in the heat furnace.
If you do this by hand, that can take quite some work! Move to the next section for the automatic way.
For this example, we will use a 50V Macerator, but the process is the same for all other machines.
If you add some load to the macerator (for example, sand), you'll need to increase heat produced by furnace.
After you remove the load, furnace will make too much heat and something will explode.
So, you will need to decrease the heat.
You can also know if macerator is in the optimal voltage by listening to the sound it makes.
The volume and pitch can tell you if the macerator is running at the optimal rate.
Analogic control
Instead of controlling the temperature by hand, you can use an Analogic Regulator to keep it steady.
Use the Temperature gauge to set what temperature you want. 250-300 degrees corresponds to roughly 50V in our case. The Analogic regulator will use the Control gauge to try to keep the temperature as close as possible to the desired temperature (called "set point").
External control
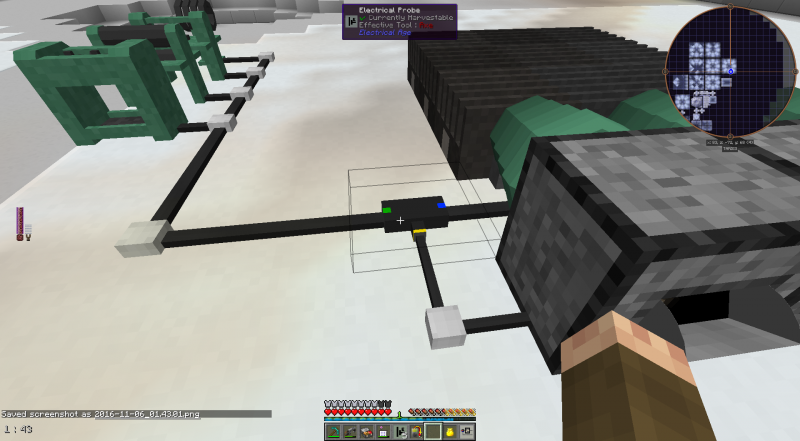
Alternately, we can control the furnace by directly measuring the voltage on the line, and adjusting accordingly.
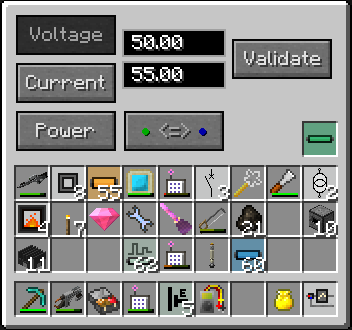
- Set an Electrical Probe to 100% output at 50V, and 0% output at 55V.
- Don't forget to place a single low voltage cable in the bottom right corner of the probe interface (so that it connects up to the rest of the wire)
- Connect the probe to our furnace using a signal cable
- Set the Heat furnace to accept External Control (click once on the button labeled Internal Control)
This should keep wire voltage neatly at ~50V. Use of External control is important in more complex builds.
Finish
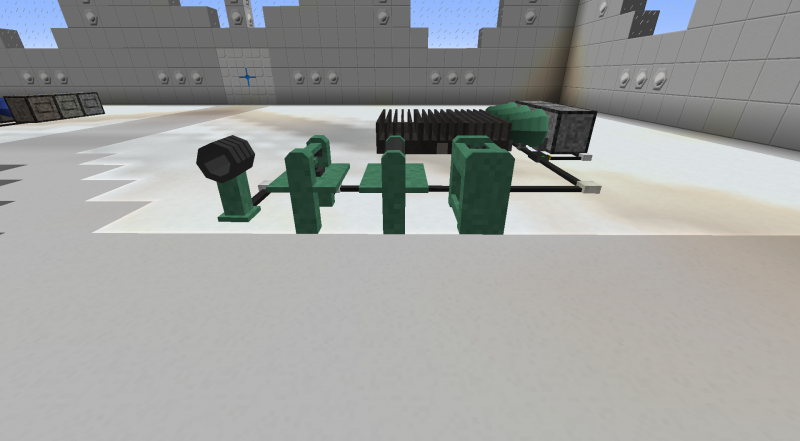
We can expand out our heat furnaces and heat turbines, so that there are 3 in a row This is the maximum that can safely be put on a single wire without over-powering it.
(It can sometimes make sense to add more, but that may need more sophisticated control)
- Heat turbines allow electricity to pass through (so no separate cable required)
- Heat furnaces allow a signal to pass through too (so no extra signal wire needed).
Finally, we add the other machines *needed* to boot Electrical age.
These are, from left to right:
You can consider adding Machine Boosters to make your machines faster,
be careful not to draw too much power though!
Where to go next
In theory, you should be able to make parts for any of the other Examples. At 50V that is going to take some time though.
After you make enough Alloy Plates, Advanced Motors and Advanced Machine Blocks, you can move on to 200V example build.
